Tipster: Multiple Exposures With the Lomo'Instant Automat Glass and a Splash of Color
5 Share TweetToday we are all about multiple exposures, as well as adding a splash of color to our images. What we need is: a Lomo'Instant Automat Glass, a pack of Instax film, some color gels, a splitzer, and a friend to take photos of.
One of the most important rules to remember when shooting double exposures is that everything dark in the first picture will remain for the second image, while the highlights will be destroyed information. The Instax film is 800 ISO so be careful with your exposure not to burn too many highlights.


First Exposure
The first exposure we are going to take is of our subjects. In this photo, we will also use the flash and the colored gel to tint our image. We want to keep the first image simple and with a neutral and light-colored background as the second one will be quite a busy scene.
A clean background will create an empty space for the second image to appear. In order to see the colored gel we must shoot with flash so it will tint the first frame. It will also help to make the darker part of the portrait distinct.
To get a good result we need to make sure our camera settings are correct. The flash must be on, the MX button must be switched on, and our focusing distance must be accurate. We chose 0.6m to allow the flash to hit the face of our subject evenly. Being close to your model means the flash will be bright and powerful enough.


Second Exposure
Now onto the second exposure. We have decided to focus on a pattern that can give texture to the image. In these images, the settings should be as follows: turn off the flash and make sure that you are overexposing the picture by clicking the feature of the plus, leave the MX on to allow double exposure - you will turn it off when you are finished and the picture will be ejected.
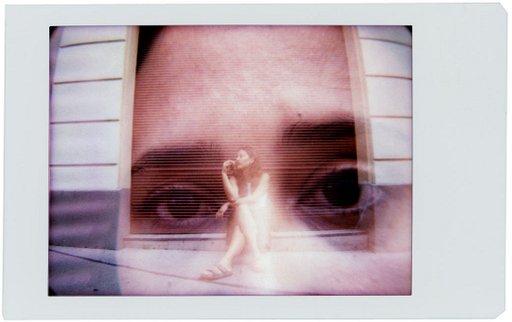
Because the highlights in the first image will destroy the information in the second, you must remember where our subject was and frame the picture in a way that will hopefully show their features. Our aim is to balance the negative and positive shapes.
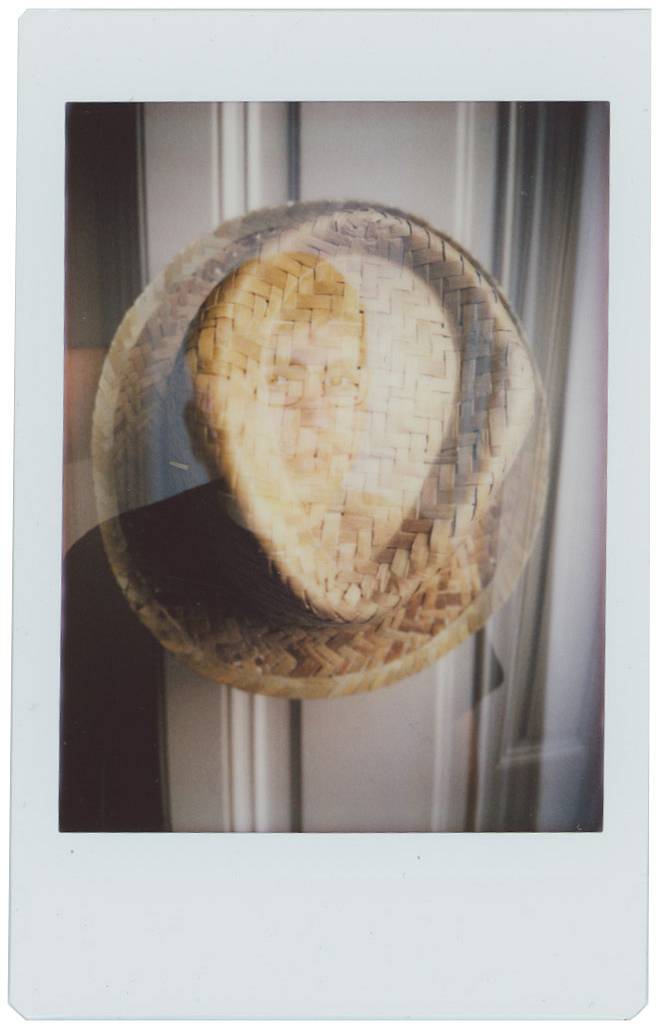


As you can see in the samples above, it is important to plan for the bright areas as well, to allow the first picture to come through. If the second scene is too contrasty, and has a darker tone and strong shadows, it will not show the first image.
Don't be afraid to try a triple exposure. In this case, we suggest that you shoot the pattern first, something with a large enough surface to allow both pictures to appear. All camera settings should be the same, use the flash on your model and overexpose your pattern.


Using a splitzer will be particularly helpful when you want to frame your model and have them appear twice.
It takes a little bit of practice to get a double exposure right, especially framing it so that the image is still readable. Don't be afraid to experiment and see which exposure works best. In different scenarios, outdoor vs indoor, or direct sunlight vs shade.
Have you already experimented with double exposure with the Lomo’Instant Automat ? Share your results with our community.
written by eparrino on 2023-07-18 #gear #tutorials #videos #splitzer #color-gels #instax #double-exposure #multiple-exposures #lomo-instant-automat


No Comments